
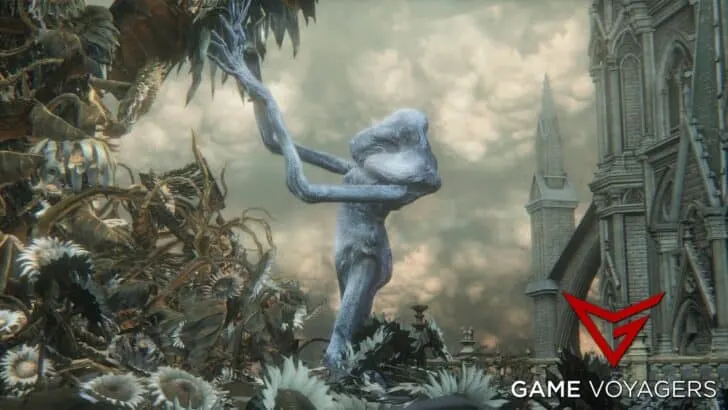
The Living Failures are the bosses right before Lady Maria’s boss fight in the Old Hunters DLC in Bloodborne. These deformed Celestial Emissaries are easier individually, but you can easily get overwhelmed since there are so many of them. Even so, this boss pails in comparison to the monstrosities you have already fought so far.
To make this fight even more comfortable, we have assembled this guide to make this boss live up to their name.
Fighting Living Failures


The Living Failures are a group boss fight. At any given time, there can be 4 to 6 Living Failures on screen. They share a single HP pool although you must defeat them individually. Each one of the Failures has its separate hidden health bar, which when depleted, one will die and another will respawn after some time.
There are two types of Failures in this fight; ones who like to rush you and perform melee attacks and others who like to stay back and fire different kinds of Arcane magic at you. Their attacks are surprisingly hard-hitting, taking a majority of your health with just a few strikes.
The gank nature of this fight is its toughest part; however, there is enough room in the arena and moments in between each kill where you have enough to heal up or buff if you want.
When their health reaches 60%, these broken bulbous freaks summon a meteor shower from the cosmos. This attack is deadly as hell but there is a neat little trick to completely ignore it.
All in all, this fight is pretty easy. Maybe because the next boss fights right after this one is one of the hardest in Bloodborne.
Here are some tips you can use when facing Living Failures in Bloodborne:
- They are extremely weak to Bolt Damage. Buff your weapon with Bolt Paper to exploit this weakness.
- Fire damage works great too against this boss.
- Weapons with the “Vs Kin” attribute will deal more damage to this boss.
- The melee Failures are highly susceptible to parrying and Visceral Attacks.
- Consuming a Beast Blood Pellet will increase your damage output taking them out in fewer hits.
- Having a friendly Hunter or Yamamura NPC Hunter will make this fight even more trivial.
- Use the tree in the middle of the arena to protect yourself from the Arcane projectiles, meteor shower, and create some distance from the bosses.
- Rapid Poison works exceptionally well against the boss. They are weaker to this status effect and it eats away their health pool. However, it won’t kill any individual Failure.
- Blocking with the Loch Shield will absorb all the damage from the meteor shower provided you have enough stamina.
- The Shaman Boneblade will turn one failure to fight for you. Great for distracting the rest.
- Attack the Failure when they are spawning in. They have no way of defending themselves during this animation so use it to your advantage.
Boss Strategy


The best strategy for this boss encounter is to lure a single Living Failure and try to kill them before moving on to the others. Don’t let yourself be overcrowded. Single them out and defeat them one by one.
The best ones to go for are the ones who stand back and fire projectiles at you. These Failures have only a head slam attack when you are close to them which can be avoided if you stand behind them. Pick them off as soon as you spot one standing in the back.
For the melee ones, stick to parrying them with your gun. You can easily parry each of their melee attacks giving you a huge window to move in and perform a Visceral Attack. They can be taken out quite quickly if you master the parrying skill.
When they start summoning the meteor shower attack, beeline toward the locked gate at the other end of the arena. The pillars on its sides will completely block the meteor shower, giving you ample time to heal up and buff to your liking. Let the attack finish and then move in to attack.
These Failures are fragile, dropping left and right with minimal effort from your side. The only things you need to worry about are getting overwhelmed, starting running when this happens, and their hard-hitting attacks, which take away a ton of health.
Moveset
Here are all the attacks you have to look out for:
Melee Living Failures
- Arm Swipe: Swipes his hand twice left and then right.
- Reaction: Dodge twice for both attacks or move to another Failure. Standing behind him will also negate this attack.
- Arm Flailing: Flails their arms sideways.
- Reaction: Dodge away.
- Head Slam: Slams its head into the ground directly in front.
- Reaction: Dodge back or move behind them to deal some damage.
- Overhead Slam: Same as Head Slam but with its hand. Leads to an explosion in the later stage of the fight.
- Reaction: Dodge to the side and take advantage of the long recovery time afterward.
Magic Living Failures
- Large Orb: Puts its hands forward to charge a giant orb and sends it your way. The orb explodes upon impact with either you or any surface.
- Reaction: Dodge to the side and it’ll miss you. Just be careful of the explosion. If you are near the caster, move behind them and give them everything you got. This attack won’t hit you when you are behind their back.
- Volley: Summons a black orb above them which fires 6 slow-moving missiles at you.
- Reaction: Move behind the tree in the middle to stop these missiles dead in their track. You can even cancel this attack if you stagger them while they are charging it.
- Meteor Shower: All of them will raise their hands up to the sky which then envelopes the arena in darkness. Soon after, meteors will start raining from the sky to the arena. They will always fall from the top right corner.
- Reaction: Run to the locked gate at the other end and stand there since none of the meteors will reach this safe spot.
Rewards for Defeating Living Failures


Defeating the Living Failures in Bloodborne will reward you with 22,000 Blood Echoes and the Astral Clocktower Key. Use the key to open the gate right after this boss to gain access to Lady Maria’s boss fight.