The Moon Lord is the final boss in the Desktop, Console, and Mobile versions of Terraria. In this article, we will cover in much detail what facing this boss is like and what you should do to prepare for the fight. So get ready for the ultimate guide to beating The Moon Lord in Terraria.
Moon Lord is a Hardmode, post-Lunatic Cultist boss. You need to destroy all the Celestial Pillars to summon this boss or you can use the Celestial Sigil summoning item as well. This is the hardest boss in the game and the player should be insanely prepared gear-wise to face him.
Have a look at some of the best strategies and character builds you can use for defeating The Moon Lord boss in Terraria.
How to Spawn The Moon Lord?

Moon Lord can be spawned by destroying the four Celestial Pillars. The Celestial Pillars include; Solar Pillar, Vortex Pillar, Nebula Pillar, and Stardust Pillar.
Alternatively, the Moon Lord can also be summoned using a Celestial Sigil. The Celestial Sigil is a Moon Lord boss-summoning item crafted from all four of the Lunar Fragments. Celestial Sigil has to be crafted using:
- 12 Solar Fragments
- 12 Vortex Fragments
- 12 Nebula Fragments
- 12 Stardust Fragments
- Crafting Station: Ancient Manipulator
The Celestial Sigil has specific usability requirements. These circumstances include: when the world is in Hardmode, after defeating Golem, with no active invasion events, including the Lunar Events, no surviving boss, no ongoing summoning of the Moon Lord, and when the Mysterious Tablet is not visible to any player.
How to Defeat The Moon Lord?
Defeating The Moon Lord in Terraria boils down to the class you are using. Some classes will find it harder to beat this boss while for others it will be a breeze. We will go over which weapons best suit the class when fighting the boss.
Melee Class Strategy
The Daybreak, which has a longer range, is considered the safer of the two solar weapons. Its projectiles explode when each spear expires or when the eye it is attached to closes, effectively doubling its base damage.
On the other hand, the Solar Eruption stands as the strongest melee weapon obtainable, delivering massive piercing damage to all parts of the boss. However, it necessitates staying close to the boss to fully unleash its potential.
For melee users, the ideal armor combination comprises the Chlorophyte Mask, Valhalla Knight’s Breastplate, and Valhalla Knight’s Greaves. An alternative option is the Beetle Helmet, which offers a more straightforward approach. In cases where higher damage is required, the Monk’s Shirt can be utilized.
Ranged Class Strategy
The Vortex Beater stands as the most powerful gun available for combat. When it comes to ammunition, Crystal Bullets provide the highest DPS, while Chlorophyte Bullets prove more advantageous during the second phase, where retreating becomes essential. Additionally, Chlorophyte Bullets assist in dodging attacks since they can home in on targets.
In terms of primary weapons, the Phantasm paired with Holy Arrows offers the highest DPS. However, the relatively low velocity of Holy Arrows may affect accuracy unless complemented by a Magic Quiver or one of its upgrades. In the absence of a Magic Quiver, it is recommended to use Ichor Arrows or Venom Arrows due to their higher velocity, which makes aiming easier.
An alternative to the Phantasm is the Aerial Bane, which deals bonus damage to airborne enemies and shoots multiple explosive arrows. However, it requires the player to get closer to their target due to the high gravitational falloff of the explosive arrows.
As for launchers, the Electrosphere Launcher reigns as the most potent option. Its electrosphere ability grants it significant DPS potential. On the other hand, the Snowman Cannon can prove useful during the second phase due to its homing nature.
For ranged users, the optimal choice of armor is the Shroomite armor. Although its set bonus holds little value in this particular fight, its overall attributes make it the top pick. If more survivability is required, the chest piece can be swapped with the Valhalla Knight’s Breastplate, or for increased DPS alongside summons, the Red Riding Dress can be considered.
Lastly, if you’re also utilizing minions, it may be beneficial to replace the leggings with Spooky Leggings for improved speed and summon damage.
Mage Class Strategy

The Nebula Blaze provides decent DPS and accuracy, although it comes with a high mana cost. On the other hand, the Razorpine and Blizzard Staff offer higher DPS compared to the Nebula Blaze, along with a lower mana cost.
However, they lack its homing effect. It’s worth noting that the Blizzard Staff may struggle to hit smaller targets due to its projectile spread.
For those who can manipulate the Moon Lord into remaining in roughly the same position, the Nebula Arcanum proves to be an excellent choice, delivering extremely high DPS. Furthermore, it doesn’t require precise aiming.
The Razorblade Typhoon features fast and mana-efficient projectiles that can hit all three parts of the Moon Lord with a single shot. However, its single-target DPS is not as impressive as the other four options.
An alternative, Betsy’s Wrath, inflicts a potent defense-lowering debuff that the Moon Lord is not immune to.
When it comes to magic users, the top choice of armor is the Spectre armor.
Summoner Class Strategy
The Terraprisma stands out as one of the premier summoning weapons currently available, especially when paired with the Kaleidoscope, thanks to its high tag damage synergy.
Alternatively, the Stardust Dragon Staff serves as a viable option that is much easier to obtain compared to the Terraprisma. Although it possesses lower DPS, it boasts a greater range, making it easier to deal damage while evading attacks. It also complements well with Durendal and the Firecracker.
The Stardust Cell Staff exhibits a unique feature where it fires additional shots at off-screen enemies when struck by another weapon.
When combined with a gun using Chlorophyte bullets, it enables more effective kiting of the Moon Lord offscreen, particularly when utilizing a fast mount in the second stage. This staff excels in accuracy, and its attack speed synergizes with Betsy’s Wrath.
If you prefer sentries, the Staff of the Frost Hydra emerges as the top choice. However, it functions optimally when you remain in one area, and while it may not contribute significantly to your DPS, there are no drawbacks to using it.
When it comes to whips, the Kaleidoscope is the finest option available. However, the damage boost it provides is generally not as substantial as using a secondary weapon from another class and requires perilous proximity to the Moon Lord.
When paired with the Valhalla Knight armor, it can serve as a primary weapon, capitalizing on the armor’s regeneration, high defense, and boosts to summon damage.
Utilizing multiple whips can enhance summon tag damage. The Dark Harvest and Durendal are often preferred choices, while the Firecracker can be employed alongside the Stardust Dragon Staff, amplifying the dragon’s exceptional damage per hit and nearly tripling a minion hit’s damage with its ability.
For summoners, the recommended armor choice is the Spooky armor.
Other Strategies

Here are some strategies you can use to take down the Moon Lord:
Tanking Strategy:
Using this strategy, you can defeat the Moon Lord without attempting to dodge its attacks at all.
By equipping a Squire’s Great Helm, Valhalla Knight’s Breastplate, and Cross Necklace while being fully buffed, you can heal off all the damage inflicted by the Moon Lord without facing excessive danger.
In the leg slot, you can choose to wear Valhalla Knight’s Greaves, Spooky Leggings, or Dark Artist’s Leggings to enhance melee, summoning, or magic damage output, respectively.
If you don’t have access to the Old One’s Army event, simply wearing armor pieces with the highest available defense will suffice, as long as you are buffed with Regeneration, Lifeforce, Endurance, Ironskin, Well Fed, and a Luck Potion.
The strategy is simple: stand in a pool of honey, use your grappling hook to anchor yourself in place, and gradually chip away at the Moon Lord’s exposed parts. With the Moon Lord no longer moving around, most weapons will be much easier to aim.
Since you’ll be immobile during the fight, you can focus on equipping accessories that specialize in damage mitigation, health regeneration, and damage output.
For the leg slot, it is advisable to wear Valhalla Knight’s Greaves, as they provide the highest defense. Fill all your accessory slots with defensive accessories, all of which should be reforged to Warding.
In Classic Mode, utilizing accessories such as Celestial Stone (or Celestial Shell), Star Veil (or Cross Necklace), Frozen Shield, and two other defensive accessories (such as Hero Shield or Black Belt) in conjunction with the aforementioned buff potions will enable you to safely defeat the Moon Lord while maintaining nearly full health.
In Expert Mode, this strategy still applies but with additional requirements. You’ll need the Worm Scarf and/or Brain of Confusion, as well as an arena equipped with a Campfire, Heart Lantern, Honey, Bast Statue, Garden Gnome, some form of Torch Luck, and the presence of the Dryad to benefit from her Dryad’s Blessing.
In Master Mode, the effectiveness of damage reduction and dodge chance increases significantly. For Master Mode, it is necessary to equip accessories such as Cross Necklace (or Star Veil), Frozen Shield, and Worm Scarf. Additionally, Brain of Confusion, Black Belt (or Master Ninja Gear), and Shiny Stone are recommended. As for the remaining accessory slot, Charm of Myths or Hero Shield is a wise choice.
Mount Strategy:
Just like the minecart method, employing a fast mount, such as the Blessed Apple, can simplify the fight. You can enhance your strategy by setting up teleporters at the end of a lengthy skybridge and utilizing a weapon with tracking capabilities.
This setup enables you to outpace the majority of Moon Lord’s attacks. If you prefer even greater speed, you can utilize Asphalt, although it comes with the drawback of resetting your speed when airborne.
Ramming Eye Sockets Strategy:

In Master Mode, the Moon Lord’s attacks have tripled damage, except for the eye socket’s contact damage, which remains at 80, just like in Normal Mode. This implies that if your defense is 79 or higher, you will only receive 1 damage from it while activating invincibility frames.
To make use of this tactic, you require the following: an armor and accessories setup that provides at least 79 defense, a Cross Necklace (or Star Veil) that extends invincibility frames, a shield that prevents knockback, and sufficient mobility (such as infinite flight) to keep pace with the eye socket’s movements.
However, you will still need to find a way to eliminate one eye to implement this strategy. Once accomplished, you can simply follow and make contact with the empty eye socket while simultaneously targeting other parts of the boss.
Nurse Strategy:
By utilizing the Nurse, you can receive healing whenever you sustain damage, eliminating any concerns about taking damage during the fight. It’s worth noting that the Nurse has a low chance of dying due to all NPCs taking reduced damage. Additionally, the Nurse’s ability to heal herself ensures that any damage she does incur is minimal.
To maximize the benefits of this approach, construct a dedicated house for the Nurse, activate autopause, and employ a formidable summon such as the Stardust Dragon. Simply remain inside the Nurse’s house, healing whenever you sustain significant damage while allowing the summon to handle the majority of the battle.
With this strategy, you can remove any worries about your own survival, as the summon will eventually defeat the Moon Lord. However, it is advisable to prepare adequately by ensuring you have ample funds at your disposal since healing from her isn’t cheap.
Skybridge Strategy:
Utilizing asphalt as the foundation for a skybridge is advantageous for evading the Moon Lord’s attacks and allowing time for health regeneration. To further enhance survivability, incorporating pools of honey, along with campfires and heart statues, enables you to endure more damage and recover health at a quicker pace.
For this strategy, ranged weapons prove most effective: employ the Daybreak for melee, the Vortex Beater for rangers, the Stardust Dragon Staff for summoners with a whip to target specific parts of the Moon Lord while on the move, and the Nebula Blaze for mages.
In the event that you find yourself drifting too far from the Moon Lord, executing an upward flight maneuver to circle around him ensures that you can maintain distance while continuing your evasive tactics.
What are the Difficulty Differences?

The boss has different stats depending on the difficulty and the phase it is in. These differences are as follows:
Classic Mode
In Classic Mode the Moon Lord in Terraria has the following stats:
| Stats | Moon Lord (Face) | Moon Lord’s Hand | Moon Lord’s Core | Total |
|---|---|---|---|---|
| Damage | 60-150 | 60-80 | 0 | – |
| HP | 45000 | 25000 | 50000 | 145000 |
| Defense | 50 | 40 | 70 | Depends on the part |
| Knockback Resistance | 100% | 100% | 100% | 100% |
| Immunity | Confused Shimmering | Confused Shimmering | Confused Shimmering | Confused |
| Inflicts | – | – | – | Moon Bite debuff 14 seconds duration |
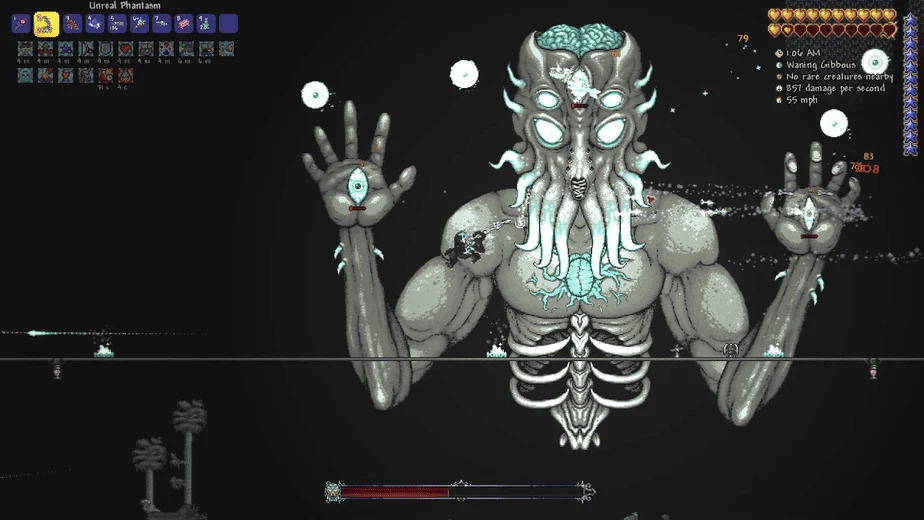
The Moon Lord possesses two hands and a head, which must be eliminated before his Core becomes vulnerable to attack. Positioned at a distance from the player, his hands are placed on either side.
Each hand and the head contain an eye-like target that periodically opens and closes through an eyelid. These targets can only be damaged when in their “open” state. When performing most of its attacks, the eyes will remain stationary. However, defeating the boss requires destroying all the eye targets to render the core vulnerable.
If all players venture too far out of range, the Moon Lord has the ability to teleport to their locations. Moon Lord will teleport to the nearest player if the player he is targeting dies or moves more than 150 tiles away.
Attacks
The Moon Lord’s hands disengage from the core, causing six Phantasmal Spheres to spawn. These spheres explode after a short period, inflicting substantial damage. When the player is far away, the spheres simultaneously charge toward them before exploding.
Moreover, the eyes of the hands generate multiple Phantasmal Eyes that initially move in various directions before homing in on the player. If they fail to lock onto a direct target within range, they will attempt to match the player’s trajectory to intercept their path. These eyes explode upon contact with a block or the player.
Occasionally, the hand eyes unleash two consecutive Phantasmal Bolts aimed at the player, passing through blocks and requiring swift evasive maneuvers. Alternatively, a viable strategy is to quickly descend before the bolts are fired, thereby avoiding the impending hit.
When the head eye of the Moon Lord becomes exposed every 20-21 seconds, it opens for a few seconds and emits two Phantasmal Bolts, similar to those fired by the hands. Subsequently, it releases a Phantasmal Deathray—a massive laser that sweeps upward over the player within a 60-degree range.
This attack poses the most significant threat, inflicting substantial damage, and can penetrate solid blocks obstructing the player. After executing the Deathray, the head eye blinks a couple of times, discharges two more Phantasmal Bolts, and then closes.
Following the Deathray attack, the Moon Lord’s mouth attempts to attach a tentacle to the player, capable of reaching through solid blocks.
Once attached, the tentacle spawns multiple Moon Leech Clots, which travel from the player toward the Moon Lord’s mouth. If any Moon Leech Clot successfully reaches the mouth without being defeated, it replenishes 1000 health to one of the Moon Lord’s unvanquished parts.
Furthermore, the Tentacle inflicts the Moon Bite debuff, rendering lifesteal effects from the Vampire Knives and Spectre armor ineffective for 14 seconds. Upon defeating the Head eye, the Tentacle attack becomes more frequent, with only a brief 2-second interval between attacks.
When a hand or head target is eliminated, it transforms into a thorny crevice that inflicts damage upon contact.
True Eye of Cthulhu Phase

Additionally, when a hand or head target is destroyed, a True Eye of Cthulhu will come forth. These eyes are invincible and persist unless all players perish or the Moon Lord is defeated. They cycle through the following attacks:
- Firing two Phantasmal Bolts at the player, akin to the attacks of the hand eyes.
- Summoning six Phantasmal Spheres in a hexagonal formation around itself. After a brief duration, these spheres charge directly at the player, delivering a substantial amount of damage. This attack serves as the primary source of damage in the second phase and demands evasive actions such as swerving or dashing.
- Generating Phantasmal Eyes, with behavior similar to their behavior before the eyes were defeated.
- Charging and releasing a lesser Phantasmal Deathray, smaller in size and inflicting significantly less damage. Unlike the Moon Lord’s deathray, these attacks are incapable of penetrating through blocks.
- Finally, performing another Phantasmal Sphere attack.
Expert Mode
In Expert Mode the Moon Lord in Terraria has the following stats:
| Stats | Moon Lord (Face) | Moon Lord’s Hand | Moon Lord’s Core | Total |
|---|---|---|---|---|
| Damage | 120-300 | 120-160 | 0 | – |
| HP | 67500 | 37500 | 75000 | 217500 |
| Defense | 50 | 40 | 70 | Depends on the part |
| Knockback Resistance | 100% | 100% | 100% | 100% |
| Immunity | Confused Shimmering | Confused Shimmering | Confused Shimmering | Confused |
| Inflicts | – | – | – | Moon Bite debuff 16 seconds duration |
The only thing that changes other than increased HP and damage when fighting the Moon Lord in Expert Mode is the duration of the Moon Bite debuff, which lasts for 16 seconds now. You also need to be extra careful of the Phantasmal Deathray attack as it can annihilate you quite easily in this difficulty.
Master Mode
In Master Mode the Moon Lord in Terraria has the following stats:
| Stats | Moon Lord (Face) | Moon Lord’s Hand | Moon Lord’s Core | Total |
|---|---|---|---|---|
| Damage | 180-450 | 180-240 | 0 | – |
| HP | 86062 | 47812 | 95625 | 277311 |
| Defense | 50 | 40 | 70 | Depends on the part |
| Knockback Resistance | 100% | 100% | 100% | 100% |
| Immunity | Confused Shimmering | Confused Shimmering | Confused Shimmering | Confused |
| Inflicts | – | – | – | Moon Bite debuff 16 seconds duration |
Everything remains relatively the same in Master Mode compared to Expert/Classic Modes. However, the attacks deal a lot more damage and the boss’s HP is way more.
Is The Moon Lord Harder Solo or With Friends?
Defeating the Moon Lord can present varying levels of difficulty depending on whether you face the challenge solo or with friends.
Generally, taking on the Moon Lord with friends can make the battle more manageable. With a group, you can distribute roles and coordinate attacks, allowing for more efficient damage output and enhanced survivability.
Combining different character classes, such as melee, ranged, magic, and summoner, can result in a well-rounded team capable of handling different aspects of the fight.
Additionally, having multiple players can provide a buffer for mistakes and allow for quick healing and support through items like healing potions and buffs.
However, it’s important to note that the Moon Lord’s health scales with the number of players, making the fight last longer in multiplayer.
On the other hand, solo encounters with the Moon Lord can be more challenging as you have to manage all aspects of the battle on your own. It requires precise timing, effective dodging, and optimal use of weapons and accessories to maximize damage and survivability.
You have full control over your strategy and can tailor your equipment and tactics specifically to your playstyle.
What are the Rewards for Defeating The Moon Lord?
The rewards for defeating The Moon Lord in Terraria differ according to the difficulty. The majority of rewards are the same for all difficulties except a few and sometimes the drop rates increase at higher difficulties. We will highlight all these rewards and changes below:
Classic Mode Rewards
| Reward | Quantity | Drop Rate % |
|---|---|---|
| Platinum Coin | 1 | 100% |
| Super Healing Potion | 5-15 | 100% |
| Luminite | 70-90 | 100% |
| Meowmere Minecart | 1 | 10% |
| Moon Lord Mask | 1 | 14.29% |
| Moon Lord Trophy | 1 | 10% |
| Two of the following 9 weapons is a guranteed drop | ||
| Meowmere | 1 | 22.2% |
| Terrarian | 1 | 22.2% |
| Star Wrath | 1 | 22.2% |
| S.D.M.G | 1 | 22.2% |
| Last Prism | 1 | 22.2% |
| Lunar Flare | 1 | 22.2% |
| Rainbow Crystal Staff | 1 | 22.2% |
| Lunar Portal Staff | 1 | 22.2% |
| Celebration Mk2 | 1 | 22.2% |
Expert Mode Rewards
| Reward | Quantity | Drop Rate % |
|---|---|---|
| Platinum Coins | 2 | 100% |
| Gold Coins | 50 | 100% |
| Treasure Bag | 1 | 100% |
| Gravity Globe | 1 | 100% |
| Suspicious Looking Tentacle | 1 | 100% |
| Celestial Starboard | 1 | 100% |
| Luminite | 90-110 | 100% |
Master Mode Rewards
| Reward | Quantity | Drop Rate % |
|---|---|---|
| Piece of Moon Squid | 1 | 25% |
| Moon Lord Relic | 1 | 100% |
There you go; this was the ultimate guide to beating The Moon Lord in Terraria. This is the final boss of the game, so need to be adequately prepared for the fight. Once the fight is over, the credits will roll, and you are free to do whatever you want in the Terraria.

