If you have played a FromSoft game before, you will know that you will need to upgrade your weapons. It is in most games the developer makes, so you must know where to find these upgrade materials you will need in your playthrough. Elden Ring is no different when it comes to this sort of thing.
You will not only need to upgrade your weapons, but you will also need to upgrade your shields. This means you will need many of these upgrade materials to upgrade everything you want within one playthrough fully. They aren’t that difficult to get, but if you are new to the game, it can be extremely confusing what to do.
You can buy Smithing Stones from Merchants worldwide or find the Miner’s Bell Bearings for each upgrade material. Once you get these Bell Bearings, you can give them to the Twin-Maiden Husks in the Roundtable Hold and buy as many as you like.
What is the difference between Smithing Stones and Somber Stones?
As we said before, there are two different types of Smithing Stones. The Regular Smithing Stones are for any basic weapon or shield you can place an Ash of War onto. Ashes of War are like special movesets you can put onto your weapon that change how you use it. You will need 12 of each Smithing Stone to upgrade a weapon fully.
The Somber Smithing Stones are for Special weapons or shields. Special gear is the one that you can’t customize. Whatever the skill is on the weapon, you can’t swap it out for something else. These are great because you will only need 1 of each Somber Stone to upgrade a piece of gear fully. If you don’t want to deal with Ashes of War, Special weapons are probably the way to go.
Smithing Stone Miner’s Bell Bearing (1)
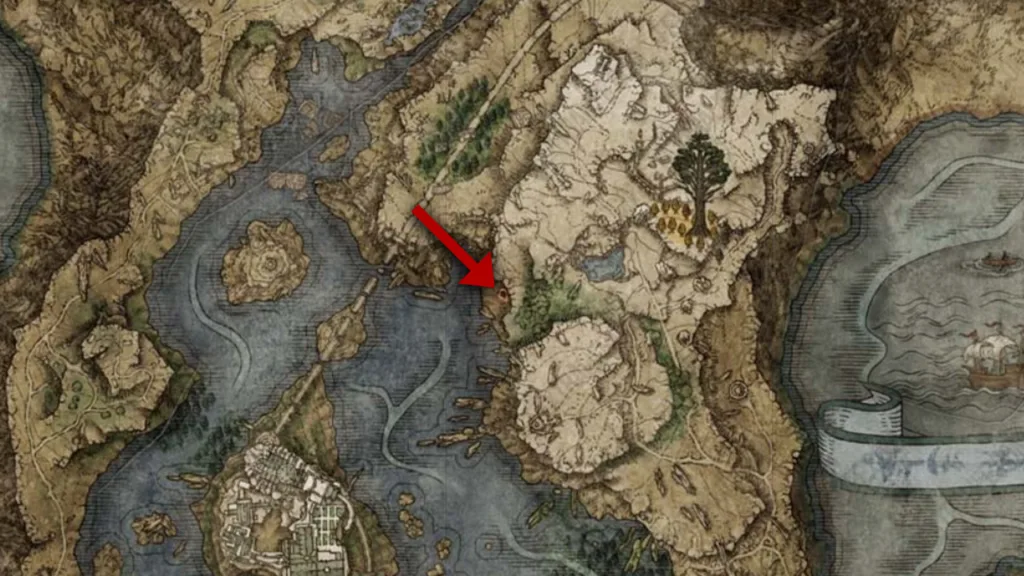
Location: Dropped by the Crystalian Boss at the end of Raya Lucaria Crystal Tunnel.
This boss is a very odd one. If you tried to fight this boss before and gave up because it was too difficult, you might be looking at it wrong. It is a Crystal enemy, so your best bet is to use a blunt weapon. It will seem like you aren’t doing damage until they break, and they take massive damage after that. It isn’t a difficult fight, but it takes patience.
Restocks: It allows you to purchase both Smithing Stones (1) and (2), and it also allows you to buy Glinstone Scrap from the Twin-Maiden Husks at the Roundtable Hold.
Smithing Stone Miner’s Bell Bearing (2)
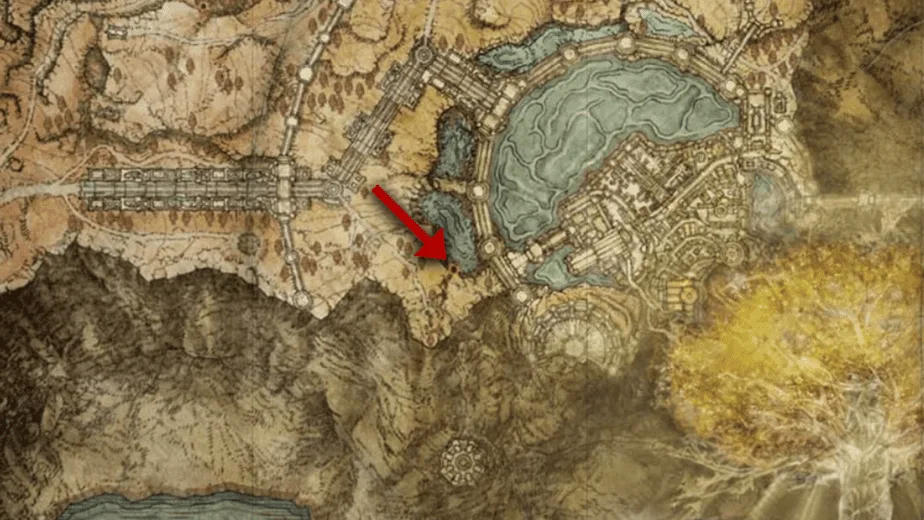
Location: Found in a chest at the first secret area inside the Sealed Tunnel.
To find this chest, just walk into the cave. You will then reach a dead end. Just attack the illusory wall and make your way into the first room. Defeat all the enemies inside and go to the back area of the cave. You will then see a chest. If you open it and loot it, you will get the next Bell Bearing you need to purchase the Stones.
Restocks: It allows you to purchase both Smithing Stones (3) and (4), and it also allows you to buy Explosive Stone from the Twin-Maiden Husks at the Roundtable Hold.
Smithing Stone Miner’s Bell Bearing (3)
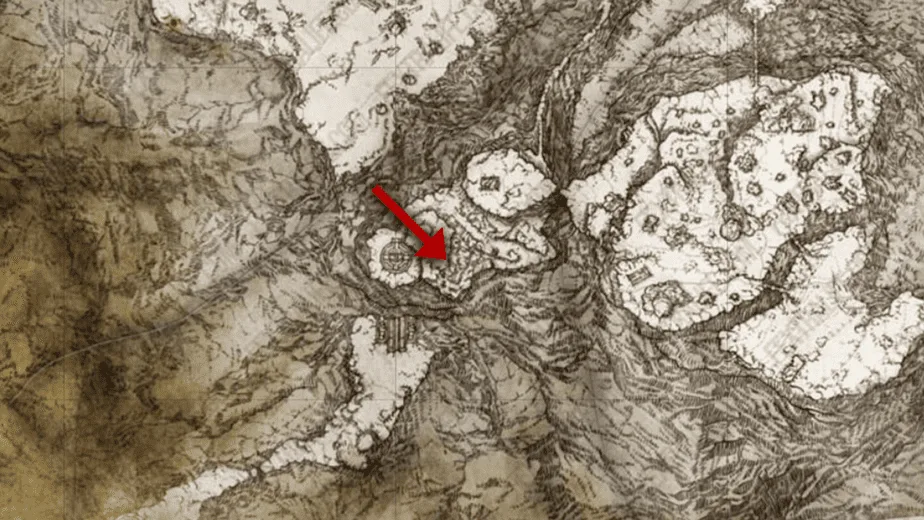
Location: The bell bearing is found in Zamor Ruins in the Mountaintop of the Giants at the bottom of the stairs in a chest.
This one is a little tricky to find. You need to find your way into the ruins and avoid the really annoying enemies that are surrounding the area. You will then need to find an illusory wall on the ground and smack it. Once you do this, you can walk down the stairs and grab the next Bell Bearing from the chest at the bottom.
Restocks: It allows you to purchase both Smithing Stones (5) and (6) from the Twin-Maiden Husks at the Roundtable Hold.
Smithing Stone Miner’s Bell Bearing (4)
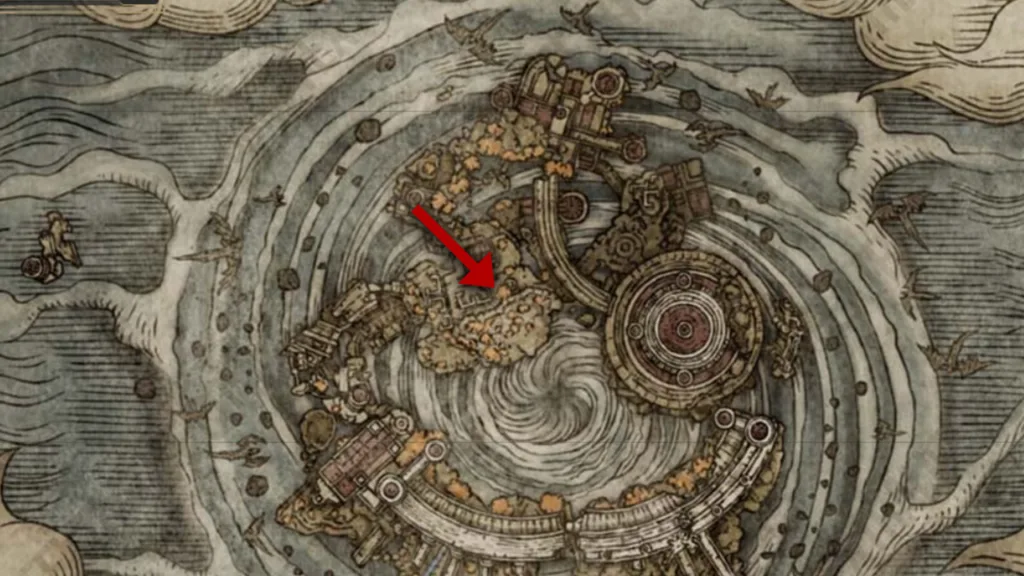
Location: Obtained from defeating The Godskin Duo in Crumbling Farum Azula.
This is a Bell Bearing that you will automatically get for proceeding in the story. You must defeat the Godskin Duo in Crumbling Farum Azula to get this Bearing. It isn’t an easy fight but a good reward for beating a difficult boss. You have probably fought these enemies before, but never together.
Restocks: It allows you to purchase both Smithing Stones (7) and (8) from the Twin-Maiden Husks at the Roundtable Hold.
Somberstone Miner’s Bell (1)
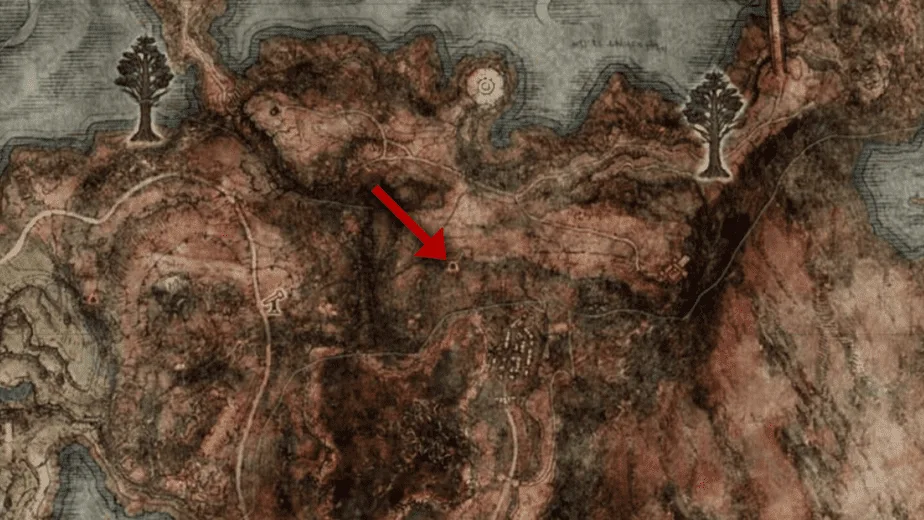
Location: Dropped by the Fallingstar Beast upon defeat in the Sellia Crystal Tunnel.
As we said, the first Bell Bearing is acquired by defeating a Fallingstar Beast. Not only is the mine you need to trek through full of annoying enemies, but the boss itself is also extremely annoying. If you have ever fought a Fallingstar Beast or haven’t, it isn’t the most fun experience. Once you finally get through the fight, your reward will be well worth it.
Restocks: It allows you to purchase both Somber Smithing Stones (1) and (2), and it also allows you to buy Glinstone Scrap from the Twin-Maiden Husks at the Roundtable Hold.
Somberstone Miner’s Bell (2)
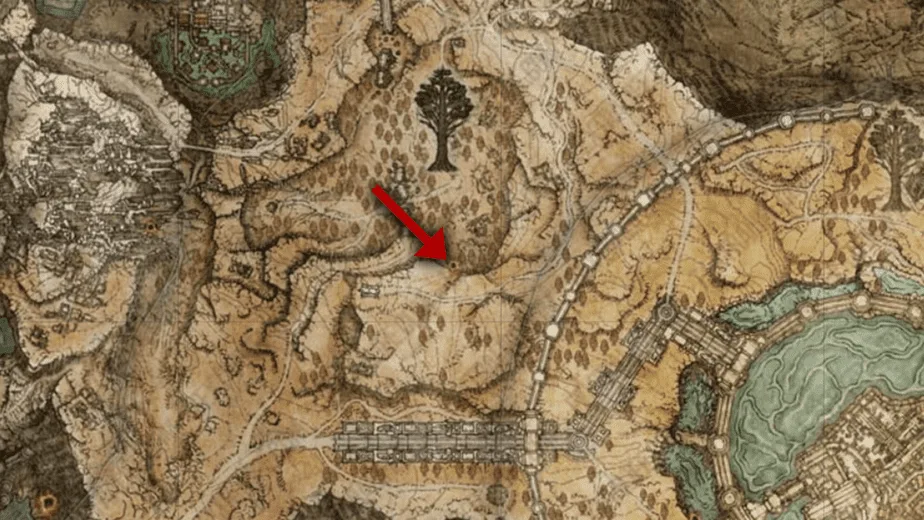
Location: Dropped by the Crystalian Spear and Ringblade boss in the Altus Tunnel.
This boss is exactly like the Crystal Boss for the other Smithing Stone, but the game makes it harder by adding in 2 of these annoying bosses within one fight. At least you don’t have to fight the version of this fight with a third added to get the Bell Bearing. Just defeat both of them with a blunt weapon; it shouldn’t be that hard.
Restocks: It allows you to purchase both Somber Smithing Stones (3) and (4) from the Twin-Maiden Husks at the Roundtable Hold.
Somberstone Miner’s Bell (3)
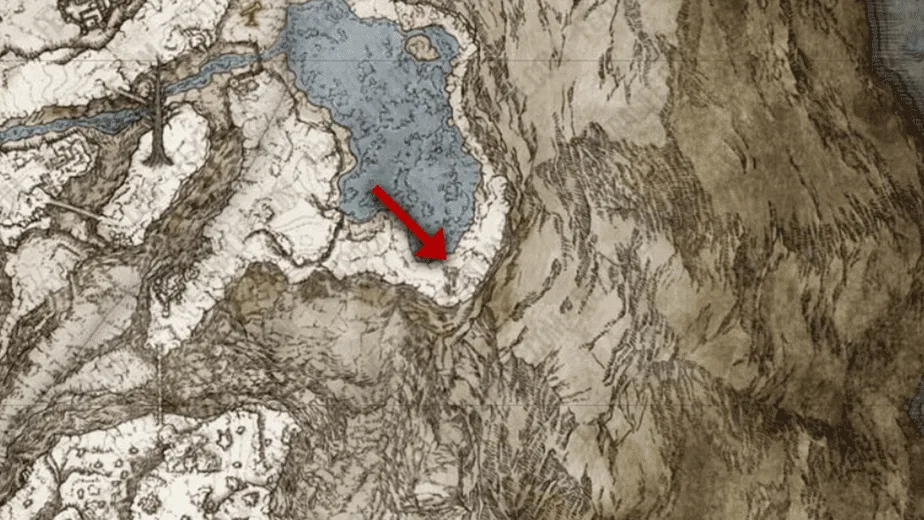
Location: Found on a body outside the First Church of Marika in Mountaintops of the Giants.
This is one of the easiest Bell Bearings to find. All you need to do is go to the other side of the frozen lake and grab the Bell Bearing from the dead body right in front of the First Church of Marika. It is just sitting there. Just make sure to either defeat or run past the Dragon boss that spawns near there, though. It is not a super-fun fight.
Restocks: It allows you to purchase both Somber Smithing Stones (5) and (6) from the Twin-Maiden Husks at the Roundtable Hold.
Somberstone Miner’s Bell (4)
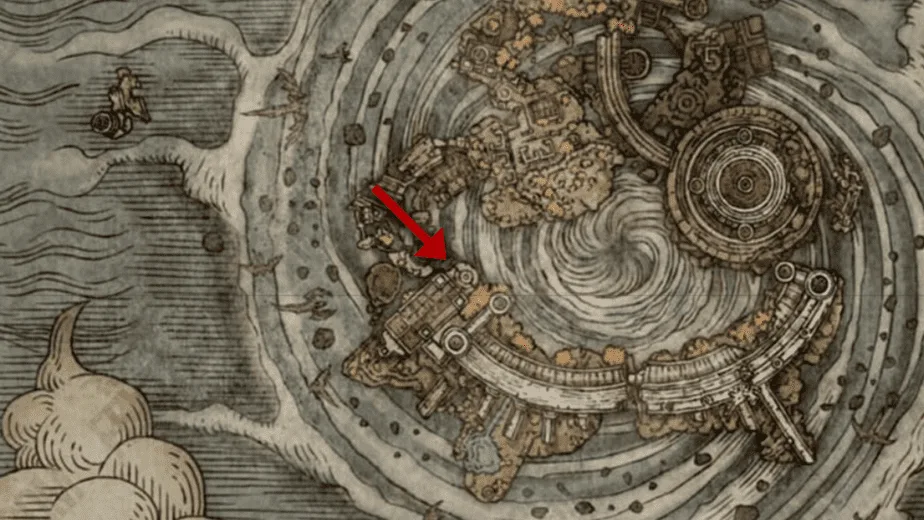
Location: Found on a corpse next to Tempest-Facing Balcony Site of Grace located in Crumbling Farum Azula.
When it comes to Crumbling Farum Azula, the whole place is pretty confusing when finding where you should go. It doesn’t give you any information on what to do, and the Bell Bearings are even harder to find. Once you reach the Balcony, the Bell Bearing is on a body on one of the lower ledges to the left.
Restocks: It allows you to purchase both Somber Smithing Stones (7) and (8), and it also allows you to buy Sanctuary Stones from the Twin-Maiden Husks at the Roundtable Hold.
Somberstone Miner’s Bell (5)
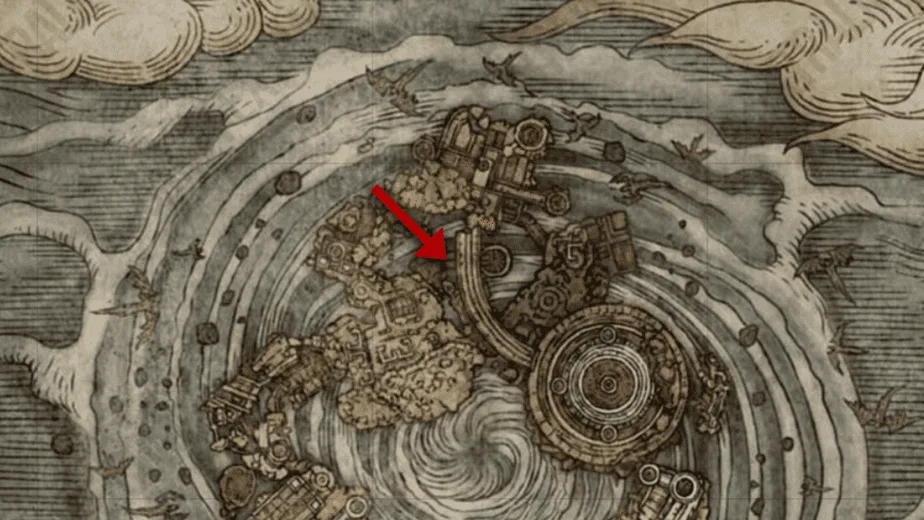
Location: Found on a body in the abandoned temple on the North side of Crumbling Farum Azuna.
This one is difficult to get since the enemies surrounding it are very annoying. We recommend running past them and touching the SIte of Grace at the top of the elevator. You will walk into a small room and see a couple of enemies inside. A dead body will be near the coffin where the enemy is standing. That is where your Bell Bearing is.
Restocks: It allows you to purchase Somber Smithing Stone (9) from the Twin-Maiden Husks at the Roundtable Hold.

