
Monuments are preset places randomly generated on the map you are playing in Rust. These places have different loot items but at the same time, many dangers lurking in them.
Some are not as easy as you think to get into because of all the preparation needed to get in and there are those monuments that you can just walk right in. Here are all 27 monuments in Rust:
1. Abandoned Cabins
 1")
 1")
These are small non-radiated areas where a player can travel that consist of 2 old wooden cabins that you can go in. There are no environmental hazards in this area so you don’t have to worry about dying very easily here.
Also, a few Loot Crates are scattered around the area that has some valuable loot in them. Make sure you go here as much as you can because of how easy it is to ambush other players.
Loot and Other Noteworthy Stuff
The kind of loot and different types of useful items in this area are:
- Loot Crates
2. Airfield
 2")
 2")
The Airfield is a Monument that is frequently encountered on randomly created maps in Experimental Rust. The Airfield has proven to be one of the game’s most popular monuments due to its various loot spawns and easy access to utilities. This, in turn, makes it somewhat contentious. The airfield’s whole perimeter is weakly irradiated.
The Airport consists of two runways, three hangars, guard towers, and an office building spread across a somewhat broad, flat region. There are additional tunnels beneath the Airport that may be accessed via concrete ladder holes. All structures are accessible to everyone and may contain Loot Crates and Barrels.
When the Attack Helicopter spawns, it will always have the airfield as a guaranteed destination.
Loot and Other Noteworthy Stuff
The kind of loot and different types of useful items in this area are:
- Noteworthy stuff:
- A Recycler in the middle hangar.
- The office building has:
- Oil Refinery
- Recycler
- Repair Bench
- Loot:
- Trash Cans
- Loot Barrels
- Oil Barrels
- Food Crates
- Medical
- Military Crates
- Large Wooden Crates
- Mining Crates
3. Bandit Camp
 3")
 3")
Bandit Camp (AKA Bandit Town) is a sort of Monument. Many cabins in the camp are occupied by Merchant NPCs as well as extremely armed NPCs known as Bandit Town Guards.
Merchant NPCs will offer military-grade weaponry and grenades in return for Scrap, as well as sell meals and buy your resources such as HQM in exchange for Scrap. The guards will attack any hostile player inside Bandit Town, as well as any player who attacks the guards themselves.
There is also a restored ‘dredge’ with a Casino where players may risk their Scrap on a roulette-style wheel. With the exception of the stone, torch, and flashlight, weapons cannot be drawn in the bandit camp.
The bandit camp, like the Outpost, has been updated into a Safe Zone. Just like the Outpost you will be killed here if you sleep for longer than 30 minutes. A new seller named Air Wolf has surfaced, where you can buy a minicopter for 750 Scrap or a Scrap helicopter for 1250 Scrap.
Another seller within the same facility provides medium-quality engine components that may be acquired to aid in the restoration of cars for mobility.
Loot and Other Noteworthy Stuff
The kind of loot and different types of useful items in this area are:
- Merchants – Weapons and Grenades
- Casino
- Recycler in the casino building
- Drone Marketplace
- Air Wolf – Minicopter seller
- Engine Component merchant
4. Cargo Ship
 4")
 4")
The Cargo Ship is known as the “CCSC Lazarus” and is a mobile monument that only spawns at certain times. When it does spawn, it will slowly circle the entire map a few times and then leaves the area. The ship leaves behind Radiation poisoning so don’t follow it if you can’t get on it in time.
Keep in mind that there are a ton of Scientists that inhabit this large vessel. On top of that, it is often overrun by other players hence it is no place for a new player.
Loot and Other Noteworthy Stuff
The kind of loot and different types of useful items in this area are:
- Keycards
- Guns
- Loot Crates
- Barrels
- Lowgrade Fuel
- Scientists
5. Cave
 5")
 5")
A Cave is a monument that naturally occurs in basically any randomly generated world. These caves usually have some puzzles for you to figure out and be rewarded with great loot. There are currently nine different Cave layouts in the game, three for each Cave type.
Some regions within the caverns allow for the construction of player-created structures. These buildable places are indicated by little tree stumps at the cave room’s entrance. These caves are the perfect places for protected bases.
Small Caves – The small caves are available in three different configurations, each with a single entrance and exit. The puzzles within the caverns are simple and non-lethal. They also include one or two construction rooms.
Medium Caves – The three medium-sized cave layouts will feature two or three routes of entry on average. The network intricacy is more difficult to remember, and they may also incorporate a single lethal trap. The puzzles are a little more challenging, with two to four build rooms.
Large Caves – There might be up to five ways of entrance and exit in any of the three big cave layouts. The network complexity is the most difficult of all caves, and it contains multiple lethal puzzles. The caves might possibly include up to eight distinct building chambers.
Loot and Other Noteworthy Stuff
The kind of loot and different types of useful items in this area are:
- Puzzles
- Build Rooms
- Mineable Rocks
6. Crow’s Nest
 6")
 6")
The Crow’s Nest is a randomly generated structure. It can be found around and in radtowns as well as larger landmarks, such as the Water Treatment Plant and Nuclear Power Station.
The Crow’s Nest is a small, rusting metal tower with a spiral staircase to the top. It is typically a location for loot crates and, on rare occasions, a cluster of Crow’s Nests (sometimes connected by overhead walkways). Crow’s Nests aren’t usually formed on their own, and you’re more likely to see them as part of a radtown.
Loot and Other Noteworthy Stuff
The kind of loot and different types of useful items in this area are:
- Loot Crates
- Crow’s Nests
7. Harbor
 7")
 7")
The Harbor is a kind of Monument seen in Experimental Rust. The harbor has two dent variations, one small and one large. The harbors emit no radiation, making them a good site for newborn players.
Harbors are located near coasts and other coastal locations and contain anchored container ships with accessible containers, shipwrecks, climbable container cranes, forklifts, and military trucks.
Loot and Other Noteworthy Stuff
The kind of loot and different types of useful items in this area are:
- Recycler
- Small Oil Refinery
8. HQM Quarry
 8")
 8")
The HQM Quarry (High-Quality Metal) is a kind of Monument seen only in Experimental Rust’s procedurally generated environments. It is one of the rare monuments that is radiation-free.
The Mining Quarry is in the middle. Around the area, there are a few barricades and stone slabs heaps. The guard tower and a small shelter nearby are the only structures on Quarry Monuments. The Mining Quarry monument features a small no-build zone that players can build around and potentially wall off.
Loot and Other Noteworthy Stuff
The kind of loot and different types of useful items in this area are:
- High-Quality Metal Ore: Around 25 High-Quality Metal Ore per 100 Low Grade. This is 3 times more than any other Mining quarry.
9. Train Yard
 9")
 9")
The Train Yard is one of the most famous Monuments that can be found in Rust. With a few exceptions, it has moderate levels of radiation throughout.
The Train Yard is made up of various tall concrete buildings, a pair of sheet metal sheds, a climbable tower, metal pipes, and two freight cranes that are distributed along the train tracks, which are home to abandoned railway carriages.
The sewers beneath the ground can be reached in a variety of ways. A storage facility with piled shipping containers is located in front of the main building, and a railroad coal chute is close.
There are 4 Scientists located here as well. 1 in the tower. 1 in the main building in the same room as the fusebox. 2 in or outside of the building with the recycler.
Loot and Other Noteworthy Stuff
The kind of loot and different types of useful items in this area are:
- Repair Bench
- Recycler
- Pump Jack
- Small Oil Refinery
- Barrels
- Food Crates
- Large Wooden Crates
- Military Crates
- Blue Card
- Green Card
- Red Card
- Loot Box
10. Junkyard
 10")
 10")
The Junkyard is a special monument that is only found in the desert and temperate biomes. The area is also surrounded by barbed wire making it relatively harder to access.
It is a great place for starter players because there is no Radiation poisoning and it is really easy to go through. It has many Loot Crates and Barrels lying around for you to loot and is pretty big. There are places to camp so watch out for people trying to ambush you for your loot. Be very careful because you can die really easily.
Loot and Other Noteworthy Stuff
The kind of loot and different types of useful items in this area are:
- Loot Crates
- Barrels
11. Large Excavator Pit
 11")
 11")
The Giant Excavator Pit is the latest point of interest added to the landscape of Rust. Unique from other monuments, the Excavator Pit actually allows groups to mine resources. Think of it like a bigger, more complicated Quarry. The first thing you need to do is add Diesel Fuel to the tank in the engine room. You then start the engine and select a resource to mine. Wait a little bit and you can then pick up your material from the dispenser.
This is no easy task because of all the Scientists that are wandering around the area. There is also a huge amount of Radiation in the area so you do need some good protection before going in. Similar to the Oil Rig, there is a broadcast signal you can set your pagers to know when the Giant Excavator is running. This should provide a bit of balance by allowing groups to be notified when someone is excavating.
Loot and Other Noteworthy Stuff
The kind of loot and different types of useful items in this area are:
- 1 Diesel Fuel will yield you the following:
- 100 High-Quality Metal Ore per barrel.
- 2,000 Sulfer Ore per barrel.
- 10,000 Stones per barrel.
- 5,000 Metal Fragments per barrel.
- Food Crates
- Containers
- Basic Crate
- Military Crate
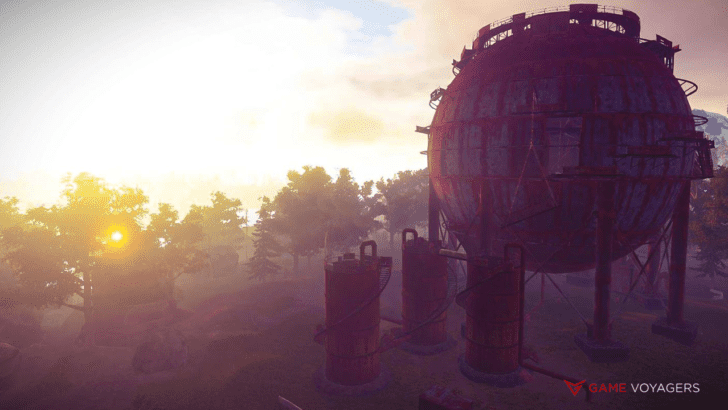
12. Launch Site
 12")
 12")
The Launch Site is the largest monument in the game and has the most loot out of all the other monuments. Not only is more loot generated here than at any other monument, but this is also the area where the new El4 spawn points for them.
Launch sites have a high amount of Radiation in the main area and an extreme amount in the factory building, requiring a Hazmat Suit to enter it safely. However, even players with Hazmat Suits will still gain gradually increasing levels of Radiation Poisoning from being inside or even too close to the factory building.
The Launch area contains a rocket that can not be interacted with, a multi-leveled crane on rails that has two lifts going to the top of it, and 4 spotlight towers. The lifts were functional but buggy, but are now fixed and working properly. They will also automatically move back down once you are at the top. There is also an APC named Bradley that roams the area and attacks anyone within its vicinity.
Loot and Other Noteworthy Stuff
The kind of loot and different types of useful items in this area are:
- 12 Military Crates
- 4 Elite Crates
- Recycler
- Barrels
- Oil Barrels
- Containers
- Research Table
- Small Oil Refinery
- Large Wooden Crates
- Medical Crates
- Food Crates are only found on the edges of the site
13. Lighthouse
 13")
 13")
The Lighthouse is a tower-like structure, usually located in coastal areas and along shorelines. It has a single unlocked entrance at the bottom. There is a spiral staircase leading up to the top, but it is broken about halfway up so you must search for a way around it.
This is one of the only monuments that doesn’t have Radiation so it is very easy for starter players. It has many Loot Crates and Barrels to loot and you can find a Supply Crate at the top of the Lighthouse.
It provides access to a Recycler so you can easily break down the stuff you don’t want for materials. The monument is generally not that populated because no Elite Crates spawn here. This is more of a starter monument for beginning players. If you want some easy material, then go here.
Loot and Other Noteworthy Stuff
The kind of loot and different types of useful items in this area are:
- Recycler
- Loot Crates
- Barrels
- Supply Crates
14. Military Tunnels
 14")
 14")
These monuments are one of the most sought-after in the game because of all the precious loot you can get here. This monument is insanely Radioactive so make sure you have the right amount of protection and Meds.
Also, Scientists roam this entire area. These Scientists aren’t just any normal Scientists, they have more armor and carry High-End weaponry. They also shoot the player on sight. There are no public utilities in this monument, so it is just for the loot alone.
The main loot crates are located inside the tunnels. The first military crate and normal crate spawn can be found inside the main entrance and to the right. There is an armored door and a short hallway with a room on the right-hand side. This room spawns the military crate, a normal crate, food, and medical crates. Further inside the tunnels, there are 2 Elite Crates that spawn on a cart.
Loot and Other Noteworthy Stuff
The kind of loot and different types of useful items in this area are:
- Recycler
- Barrels
- Food Crates
- Military Crate
- Basic Crate
- Medical Crates
- Elite Loot Crate
- Large Wooden Crate
15. Power Plant
 15")
 15")
This monument is considered one of the more popular monuments because of its good design and easy access. It also offers a bunch of loot spawns and public utilities. It has a large, concrete structure located roughly in the middle of the plant’s area.
There is a coal chute tower with a conveyor belt connected to both a processing facility and a train car loading bay with silos. On the outskirts, one can find a small sheet metal shed and an entrance to the pipe system. The pipe system is also connected to two empty coalpits.
The area does have high levels of Radiation so make sure you are suited up for it. Make sure you explore the pipe system because that is where all the good loot is.
Loot and Other Noteworthy Stuff
The kind of loot and different types of useful items in this area are:
- Recyclers
- Repair Benches
- Oil Refineries
- Pump Jack
- Research Table
- Barrels
- Trash Cans
- Loot Containers
- Food Crates
- Large Wooden Crates
- Military Crates
16. Radtown
 16")
 16")
These are particularly visible monuments since they are near roadways and telephone poles. The deeper you venture inside Radtown, the more radiation sickness you will acquire, so be sure you have a Hazmat Suit or a large supply of healing goods.
Because it is made up of small structures this area is rather easy to explore.
Loot and Other Noteworthy Stuff
The kind of loot and different types of useful items in this area are:
- Recycler
- Oil Refinery
- Barrels
- Loot Crates
- Air Drops
- Military Crates
- Wooden Crates
17. Road
 17")
 17")
These are not considered monuments, but because they are so large and have so much loot along the way, I believe they should be. Roads are useful for navigating the environment since they pass through a large area.
As you continue along the road, you will notice numerous minor looting places ideal for farming Scrap. I highly advocate using a road to travel because of all the good loot you can collect.
They serve a similar navigatory purpose as other monuments, link them, and occasionally generate loot spawns. They are commonly found in procedurally generated maps. Roads do not typically contain radiation; nevertheless, depending on the locations they pass through, radiation can occasionally be present.
Roads do not provide any access to public utilities. However, Monuments connected to the roads may have certain utilities available. Player-built utilities can also be present but do not rely on finding these.
They are also perfect for traveling because of the easy access to everything along the way. You can also try to connect your base to one so you can easily find it when lost.
Loot and Other Noteworthy Stuff
The kind of loot and different types of useful items in this area are:
- Barrels
- Food Crates
18. Satellite Dish Array
 18")
 18")
This monument is usually set up in a hilly area and has two giant Satellite Dishes built in the area. There are also other components scattered around the area because it looks as if it is still under construction. The two Dishes are scaleable and do have loot on them so make sure you try to check the entire area whenever you go here.
The area is filled with Barrels, Loot Crates, and Food Crates so search every nook and cranny for everything you can find. There are also low levels of Radiation so all you have to do is walk in with some clothing on and you are all set. Always keep an eye out for other players because it is really easy to be seen in this area.
Loot and Other Noteworthy Stuff
The kind of loot and different types of useful items in this area are:
- Recycler
- Research Table
- Barrels
- Loot Crates
- Food Crates
- Medical Crates
- Supply Crates
- Military Crates
19. Outpost
 19")
 19")
The Scientist Compound is currently one of the two safe zones for all players in the game and is a small town surrounded by walls. It is guarded by Outpost Scientists and Turrets are scattered all around. It has all the basic Public Utilities that you should be able to use and has many shops for you to trade with for special items.
You don’t have to worry about getting killed by enemy players inside because if anyone pulls out a weapon, you have 5 seconds to put it away before the Scientists and Turrets start firing on you.
Try not to make the area hostile because it is very hard to get your stuff back if you die. There is no looting allowed in the area so you won’t be able to pick your items up unless you have a plan of escape, but that is not so easy. It will take around 30 minutes for the defenses to become unhostile again.
Also, going offline in this area will cause you to die so don’t try to play it safe and go to sleep in a safe zone.
Loot and Other Noteworthy Stuff
The kind of loot and different types of useful items in this area are:
- Research Table
- Workbench Level 1
- Recycler
- Repair Bench
- Small Oil Refinery
- Small Water Catcher
- Barbeque
- Vending Machines
20. Sewer Branch
 20")
 20")
The Sewer Branch is a very basic monument as it only consists of a few shacks on a cliff edge and a small cave underneath. There is a small amount of Radiation but some burlap clothes will keep the poisoning away so it is a perfect place for new players to go.
Inside the cliff-edge shacks, players can typically find barrels and basic crates. In the tower and cave beneath the cliff edges, you can expect to find basic crates as well as food/medical crates.
If you can get a Green Card then there is a puzzle that you can solve to get into a loot room with 3-4 Loot Chests.
Loot and Other Noteworthy Stuff
The kind of loot and different types of useful items in this area are:
- Recycler
- Oil Refinery
- Barrels
- Food Crates
- Basic Crates
- Medical Crates
- Blue Keycard
- Green Military Crate
21. The Dome
 21")
 21")
The Dome is a Monument often found on procedurally generated maps in Experimental Rust. It is our favorite monument in the game because of all the stuff you can do in it. It consists of a giant hollow Dome that allows you to parkour all the way to the top.
Along the way, there are many Barrels and Loot Crates for you to find, and getting to the top is really fun. It has low levels of Radiation so simple clothes will work to keep poisoning away from you.
There are 2 Oil Refineries in the sheds on the ground and Crude Oil can be easily found in Red Barrels around the area. This monument is really fun to explore but you have to watch out because one wrong move can bring about your death.
Loot and Other Noteworthy Stuff
The kind of loot and different types of useful items in this area are:
- Barrels
- Basic Crates
- Military Crates
- Crude Oil
- Oil Refineries
22. Stone Quarry
 22")
 22")
The Stone Quarry is just like the HQM Quarry except that it can generate 2,500 Stone per 100 Low-Grade Fuel that you use.
It also gives you 375 metal per 100 Low-Grade Fuel as well. This is a really good way to get Stone.
Loot and Other Noteworthy Stuff
The kind of loot and different types of useful items in this area are:
- 2500 Stone per 100 Low-Grade fuel
- 375 Metal per 100 Low-Grade fuel
23. Sulfur Quarry
 23")
 23")
The Sulfur Quarry is just like the other 2 Quarries except that it produces 1000 sulfur per Diesel Fuel.
This is a really good way to get Sulfur Ore.
Loot and Other Noteworthy Stuff
The kind of loot and different types of useful items in this area are:
- 1000 sulfur per Diesel Fuel
24. Oil Rig
 24")
 24")
The Oil Rig is a monument located in the middle of the sea. It is not an easy location to visit especially for new or ill-equipped players. The Oil Rig can be reached via boat or RHIB, or by flying on a Minicopter or a Scrap Transport Helicopter. It can also be reached by swimming there, though this is not encouraged.
The rig is swarming with 16 Scientists which is a huge challenge to deal with but they drop amazing loot. The monument has 3 puzzle areas, green, blue, and red, therefore to get in there, you will need all three kinds of Keycards.
The Locked Crate event can also be triggered here. Once the hacking procedure, 6 Heavy Scientists will arrive on a Chinook.
Loot and Other Noteworthy Stuff
The kind of loot and different types of useful items in this area are:
- 31 Loot Crates
- Food Crates
- Medical Crates
- Ammunition Crates
- Weapons Crates
- Special Locked Crate Event
25. Water Treatment Plant
 25")
 25")
The location is dominated by multiple hallways and drained water vats, as well as a prominent huge tower, smaller “Crow’s Nest” towers, and sniper positions on a hill north of the plant itself. There are numerous blocked lines of sight, sharp angles, and obscuring items within the plant that could lead to PvP warfare.
There are some minor roads connecting the vats, and some of the vats are partially or completely obscured by the uneven land. The concrete sewers and ditches below ground level can also be examined.
There are low levels of Radiation in certain areas so make sure you wear clothing to not get poisoned. Also, it is a good place to battle other players because of all the different hiding spots. If you do get into a war with other people, this is the best place to do it.
Loot and Other Noteworthy Stuff
The kind of loot and different types of useful items in this area are:
- Crow’s Nests
- Pump Jack
- Small Oil Refinery
- Repair Bench
- Recycler
- Red Card Puzzle
- Medical Crates
- Food Crates
26. Fishing Village
 26")
 26")
The Fishing Village is one of Rust’s four safezones. It is available in two sizes: a small fishing village and a large fishing village.
The fishing village is fortified by auto-turrets that will attack any hostile players. They are friendly, but only to players who do not have a weapon or any attackable item in their hands, with the exception of the Rock, Torch, and Flashlight. If the player does not disarm within 5 seconds, the turrets will shoot to kill.
Loot and Other Noteworthy Stuff
The kind of loot and different types of useful items in this area are:
- No special loot lying about here.
- NPC Shops sells Full Diving Gear sets and Fishing gear.
- You can buy a Boat for 125 Scrap.
- You can buy an RHIB for 300 Scrap.
- You can buy a One-Man Submarine for 200 Scrap.
- You can buy a Two-Man Submarine for 300 Scrap.
- Vending Machine to sell Fish for Scrap.
27. Mining Outpost
 27")
 27")
The Mining Outpost is a form of Monument seen in the Experimental Rust’s randomly created maps. It is one of the few monuments that is free of radiation.
The Mining Outpost is a ground-level storage structure with a sloping roof and open entrances on both sides. A forklift, a small office, and wooden freight crates stacked on both metal shelves and the floor could be found on the inside.
The area does not have any Radiation so it is perfect for new players that don’t have anything. You can sometimes find weapons and armor here so make sure you check every corner for an item that you can loot. It is important to have the right gear for the later game because it does get harder.
Loot and Other Noteworthy Stuff
The kind of loot and different types of useful items in this area are:
- Repair Bench
- Basic Crates
- Recycler
- Mining Quarry
- Military Crate
- Food Crates
- Barrels
- Medical Crates
In conclusion, Rust has a lot of different places for you to explore. The monuments are the places that allow you to get the loot that will help you overcome all the other people that want to kill you and take your stuff.
You have to be careful about what you are going to do because one wrong move can make you lose everything and that can ruin your entire day. Make sure you are thinking before you do anything and have fun exploring the monuments.